Configuring DNS with Dnsmasq
dnsmasq, a program that provides DNS, DHCP, TFTP, and PXE services in a simple package.
- This will let us do some hands-on configuration of these services even if it’s not as complex as other networking solutions
Let’s start by installing dnsmasq in this machine. I’m going to type in sudo apt install dnsmasq.
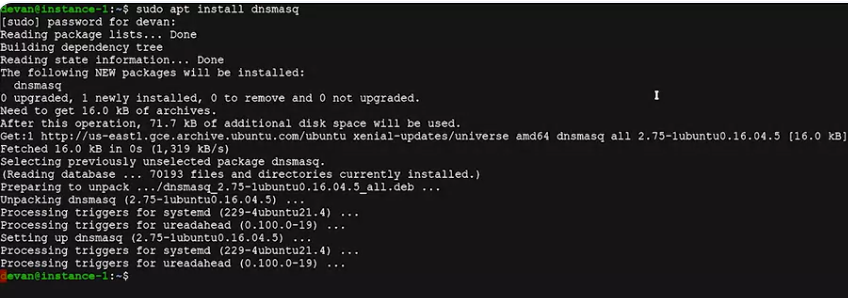 Once we’ve installed dnsmasq, it’s immediately enabled with the most basic functionality. It provides a cache for DNS queries. This means that you can make DNS requests to it and will remember the answers, so your machine doesn’t need to ask an external DNS server each time you make the query.
In order to check this functionality, we’ll use the dig command, which lets us query DNS servers and see their answers.
We do this by running dig www.example.com @localhost The part after the @ sign indicates which DNS server we want to use.
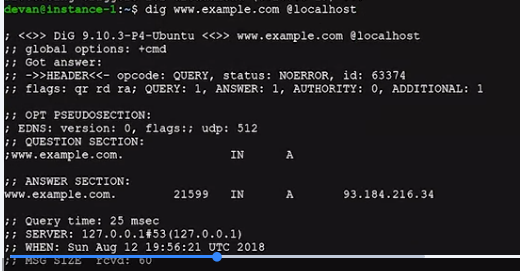 Here we have the reply from our query. Our DNS server is telling us the IP address for the domain, example.com.
 How do we know that this query was actually answered by the service the machine is running?
We can run the service in debug mode, so we get more information about what’s going on behind the scenes
so let’s stop the DNS mass service that’s running, and the start it in debug mode, so now I’m going to type in: sudo service dnsmasq stop Then type in sudo dnsmasq the -d flag and then pass the -q flag.
How do we know that this query was actually answered by the service the machine is running?
We can run the service in debug mode, so we get more information about what’s going on behind the scenes
so let’s stop the DNS mass service that’s running, and the start it in debug mode, so now I’m going to type in: sudo service dnsmasq stop Then type in sudo dnsmasq the -d flag and then pass the -q flag.
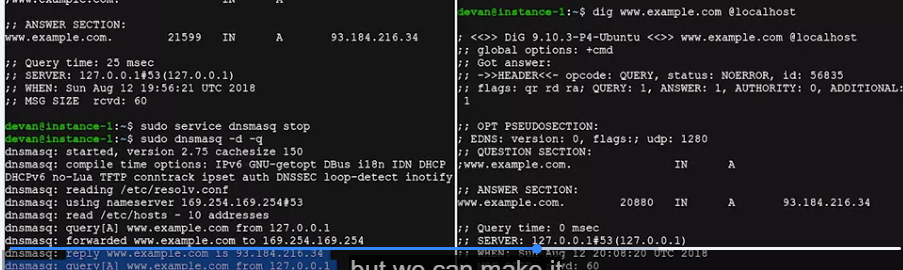
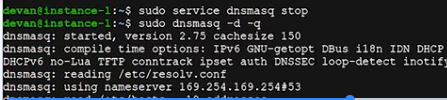 Bypassing d and q, we’re telling dnsmasq that we want to run it in debug mode, and that we want it to log the queries that we execute. When it starts, it prints in the compilation options that are enabled and the configuration files that are used. Now, we can query again with our friendly dig command. If we run the command again, we’ll get the same answer, and we’ll see the debug output in the dnsmasq console
My second console, now, I’m going to go ahead and type in: dig www.example.com @localhost
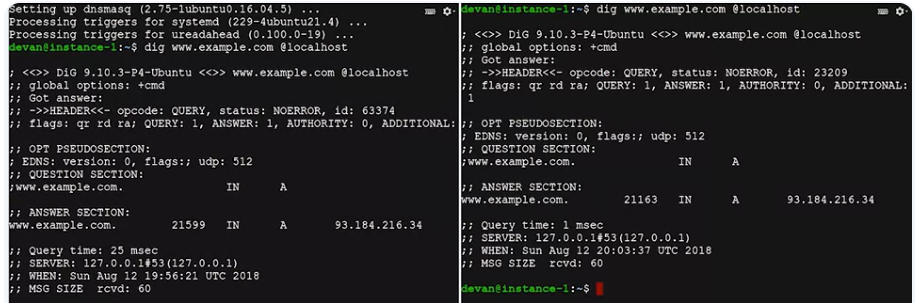 This is showing us that our dnsmasq service received the query, forward it to the configured DNS server, and then reply to the original machine. If we query for the same host name again, we’ll see that instead of asking the other DNS server, dnsmasq replies with the cached query.
Now my second console, I’m going to type in again, dig www.example.com @localhost. If I hit “Enter”, for now, dnsmasq is operating as a simple caching DNS server, but we can make it do more than that.
 this file that lists the internal host that I want to be able to resolve, so we type in: cat myhosts.txt
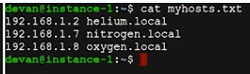 As you see, it’s a very simple format. You just have to list which IP is associated with each host.
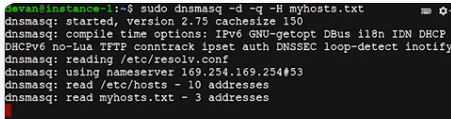
I’m going to cancel this, clear, and I’m going to type in: sudo dnsmasq -d -q -H, myhost.txt Now that we have our list of host loaded, let’s query with dig.
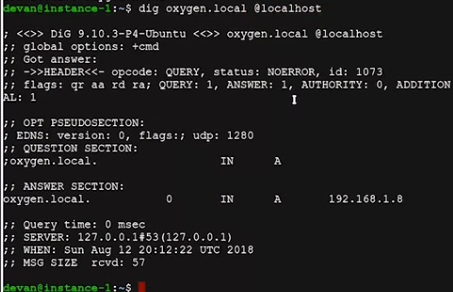
 Now my second console, I’m going to type in“ dig oxygen.local @localhost As dnsmasq is authoritative about this host, there’s nobody to forward the question to.
 It also lists which file is using to get the information, me.
 Finally, let’s see what the output looks like when we ask it for information that it doesn’t have. I’m going to type in dig hydrogen.local @localhost
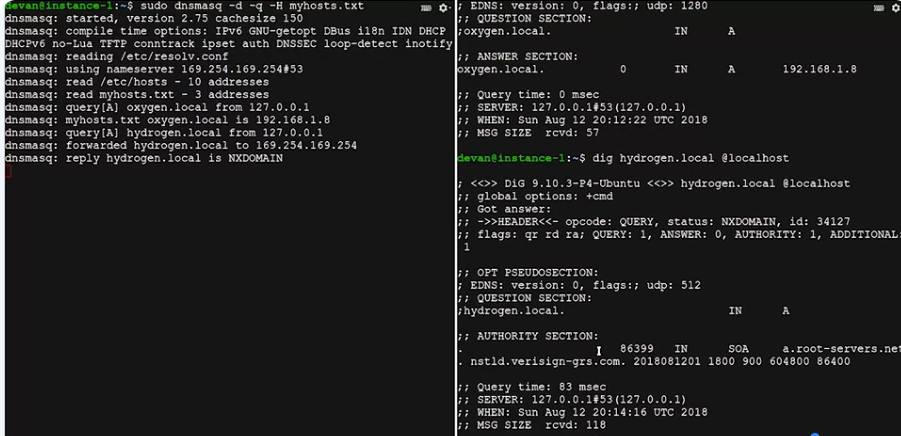 We see that it replied that the authoritative servers are the root servers, but that it couldn’t find any results.
 And what did the running dnsmasq say? Since the requested name isn’t in the list of hosts known to our DNS server, it forwards the query to the configured DNS server. The reply for that was NXDOMAIN, which means non-existent domain. While dnsmasq is as simple as it gets, you’ve now seen what a DNS server looks like in action.