Linux - Mounting and Unmounting a Filesystem
To begin interacting with the disk, we need to mount the file system to the directory. We need to create a directory on our computer and then mount the file system of our USB drive to this directory.
Let’s pull up where our partition is with Sudo parted -l
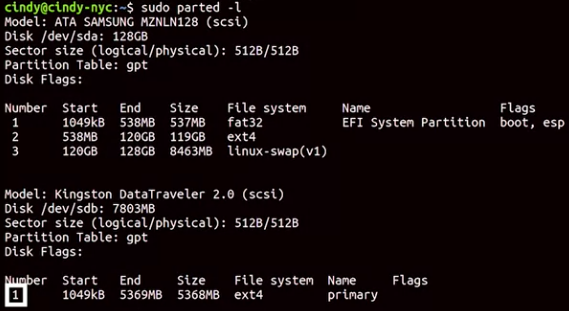 I’ve created a directory already under root called my usb. So let’s give this a try. Sudo mount dev, sdb1, my usb
 Now if we go to my usb, we can start reading and writing to the new file system.

We can also unmount the file system in a similar way using the umount command. Unmounting is the opposite of mounting a disk.
So now let’s unmount the file system. I can either use sudo, umount my usb
 or
Sudo umount dev sdb1
or
Sudo umount dev sdb1

When you shut down your computer disks that were mounted manually are automatically amounted. Always be sure to unmount a file system of a drive before physically disconnecting the drive
We can permanently mount a disk though if we need it to automatically load up when the computer boots.
To do this, we need to modify a file called /etc/fstab. If we open this up now you’ll see a list of unique device Ids.
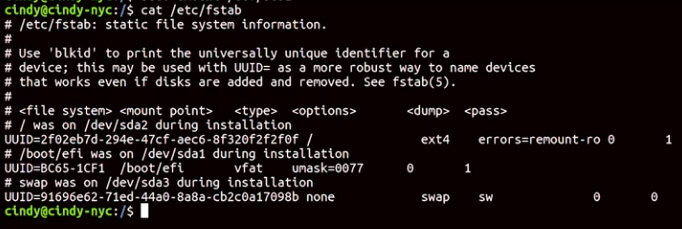 If we want to automatically mount file systems when the computer boots, just add an entry similar to what’s listed here. The first field that we need to add for fcstab is the UUID or universally unique ID of our usb drive. To get the UUID of our devices, we can use this command. Sudo blkid.
 This will show us the UUID for block device IDs aka storage device, IDs.
The fstab configuration table consists of six columns containing the following parameters:
- Column 1 - Device: The universally unique identifier (UUID) or the name of the device to be mounted (sda1, sda2, … sda#).
- Column 2 - Mount point: Names the directory location for mounting the device.
- Column 3 - File system type: Linux file systems, such as ext2, ext3, ext4, JFS, JFS2, VFAT, NTFS, ReiserFS, UDF, swap, and more.
- Column 4 - Options: List of mounting options in use, delimited by commas. See the next section titled “Fstab options” below for more information.
- Column 5 - Backup operation or dump: This is an outdated method for making device or partition backups and command dumps. It should not be used. In the past, this column contained a binary code that signified:
- 0 = turns off backups
- 1 = turns on backups
- Column 6 - File system check (fsck) order or Pass: The order in which the mounted device should be checked by the fsck utility:
- 0 = fsck should not run a check on the file system.
- 1 = mounted device is the root file system and should be checked by the fsck command first.
- 2 = mounted device is a disk partition, which should be checked by fsck command after the root file system.
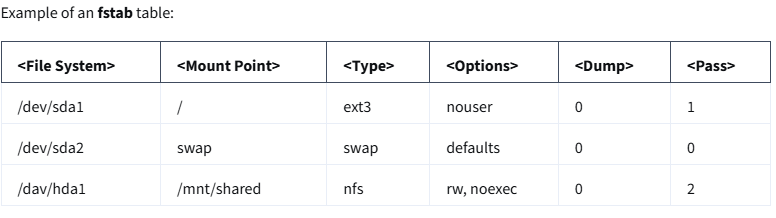 In Column 4 of the fstab table, the available options include:
- sync or async - Sets reading and writing to the file system to occur synchronously or asynchronously.
- auto - Automatically mounts the file system when booting.
- noauto - Prevents the file system from mounting automatically when booting.
- dev or nodev - Allows or prohibits the use of the device driver to mount the device.
- exec or noexec - Allows or prevents file system binaries from executing.
- ro - Mount file system as read-only.
- rw - Mount file system for read-write operations.
- user - Allows any user to mount the file system, but restricts which user can unmount the file system.
- users - Any user can mount the file system plus any user can unmount file system.
- nouser - The root user is the only role that can mount the file system (default setting).
- defaults - Use default settings, which include rw, suid, dev, exec, auto, nouser, async.
As an IT Support professional, you may need to expand the hard drive space on a server. Imagine that you have installed a new hard drive and the Linux server does not seem to recognize the drive. In the background, Linux has detected the new hardware, but it does not know how to display information about the drive. So, you will need to add an entry in the fstab table so that Linux will know how to mount it and display its entry within the file system. The following steps will guide you through this process:
- Format the drive using the fdisk command. Select a Linux compatible file system, like ext4. If needed, you can also create a partition on the drive with the fdisk command.
- Find which block devices the Linux system has assigned to the new drive. The block device is a storage device (hard drive, DVD drive, etc.) that is registered as a file in the /dev directory. The device file provides an interface between the system and the attached device for read-write processes. Use the lsblk command to find the list of block devices that are connected to the system.
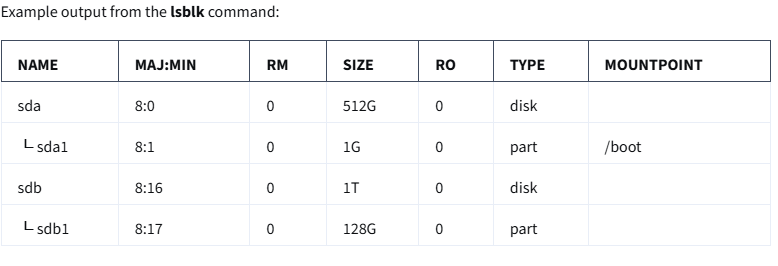 The seven columns in the output from the lsblk command are as follows:
a. NAME - Device names of the blocks. In this example, the device names are the existing sda drive and sda1 partition plus the new sdb hard drive and a newly formatted sdb1 partition.
b. MAJ:MIN - Major and minor code numbers for the device:
-
The major number is the driver type used for device communication. A few examples include:
- 1 = RAM
- 3 = IDE hard drive
- 8 = SCSI hard drive
- 9 = RAID metadisk
-
The minor number is an ID number used by the device driver for the major number type.
- The minor numbers for the first hard drive can range from 0 to 15.
- The 0 minor number value for sda represents the physical drive.
- The 1 minor number value for sda1 represents the first partition on the sda drive.
- The minor numbers for the second hard drive can range from 16 to 31.
- The 16 minor number value for sdb represents the physical drive.
- The 17 minor number value for sdb1 represents the first partition on the sdb drive.
- Minor numbers for a third hard drive would range from 32 to 47, and so on. c. RM - Indicates if the device is:
- The minor numbers for the first hard drive can range from 0 to 15.
-
0 = not removable
-
1 = removable
d. SIZE - The amount of storage available on the device.
e. RO - Indicates file permissions:
-
0 = read-write
-
1 = read-only
f. TYPE - Lists the type of device, such as:
-
disk = hard drive
-
part = disk partition
g. MOUNTPOINT - The location where the device is mounted. A blank entry in this column means it is not mounted.
- Use an editor, like gedit, to open the fstab file:
Example fstab file:
| Device | Mount Point | File System | Options | Dump | Pass |
|---|---|---|---|---|---|
| /dev/sda1 | / | ext3 | nouser | 0 | 1 |
- To add the new file system partition:
- In the first column, add the new file system device name. In this example, the device name would be /dev/sdb1.
- In the second column, indicate the mount point for the new partition. This should be a directory that would be easy to find and identify for users. For the sake of simplicity, the mount point for this example is /mnt/mystorage.
- In the third column, enter the file system used on the new partition. In this example, the file system used for the new partition is ext4.
- In the fourth column, enter any options you would like to use. The most common option is to select default.
- In the fifth column, set the dump file to 0. Dump files are no longer configured in the fstab file, but the column still exists.
- In the sixth column, the pass value should be 2 because it is not the root file system and it is a best practice to run a file system check on boot. Your fstab table should now include the new partition:
| /dev/sda1 | / | ext3 | nouser | 0 | 1 |
| /dev/sdb1 | /mnt/mystorage | ext4 | default | 0 | 2 |
- Reboot the computer and check the mystorage directory for the new partition.