Windows Troubleshooting
In an IT support environment, it’s common to come across issues that you can resolve using the log analysis tools. These tools can help with application crashes, a slow boot or startup, application hangs, or unexpected reboots. In this reading you will learn how to resolve application crashes through the Windows’ graphical user interface (GUI) and your system log files.
Solving the problem
When you begin to troubleshoot an IT issue, you should begin by researching the root of the problem. You might ask yourself these questions:
-
Is the problem unique to one computer or all computers on the network?
-
Does the problem affect a single user or all users?
-
Is the problem related to a particular application? Is that application up-to-date?
Information in your system and application logs can help you answer these questions.
Once you have figured out the problem, decide how you are going to fix it. You first attempt at fixing it might not be the right solution. This is okay and you are keeping the problem-solving process moving forward and helping to develop your technical troubleshooting skills.
After you have solved the issue and have figured out how to fix it, educate others on your team and in your company about what you discovered. Educating others about IT issues that are happening will help prevent them from happening again.
It’s also important to document your solution to a problem. Many organizations have a structured documentation process in place for IT. This documentation is a place for you to record the issues you have encountered and the solutions you discovered. If they don’t already have a documentation system, it is an opportunity to create a documentation system for your company and follow it. Documenting issues that arise, and solutions to those issues, will save the company and other IT support professionals time and resources in the future.
An example scenario
Consider this situation: One of the commonly-used software applications at your company continuously crashes around the same time every day. You use information in the Windows log files to investigate the issue and see events as they happen live. There are several types of logs you may analyze. A good way to start is by analyzing the system and application logs.
Accessing logs through the Windows GUI tool
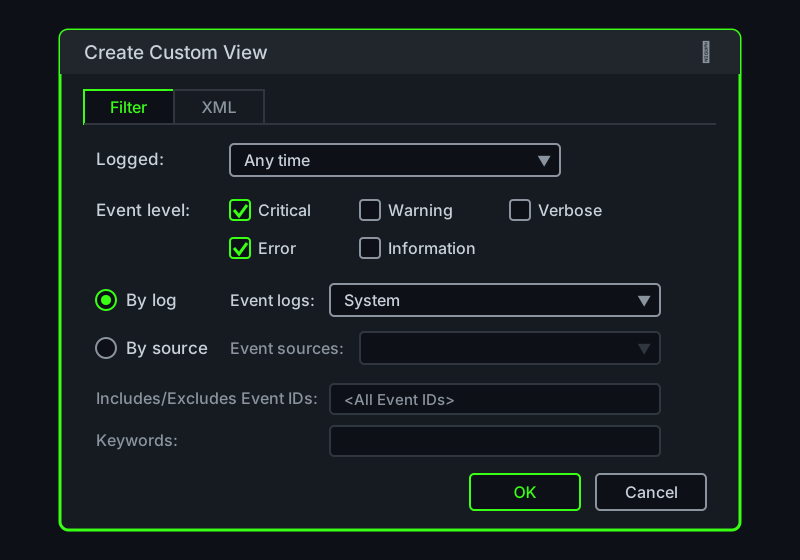
In Windows you can access logs through the GUI using the Event Viewer tool. You can launch the Event Viewer through the Windows start menus or by typing eventvwr.msc from the run box. The Event Viewer records a lot of information about the system. With a custom view, you can create a filter that will look across all the event logs and focus the view on just the information you’re interested in.
In the scenario above, you’re interested in a crash event that happens around the same time every day. You may create a custom view to filter only events that happen around the time of your crash event. Select the “error” and “critical” checkboxes to limit the view to include crash events. You can also select specific logs to view. The system log is a good place to start. Name the new view and save it for future reference.
Interpreting the log file
Once you have accessed your logs and focused on those parts that contain information most relevant to your crash event, you can examine the logs to find the root cause of the issue. Since you’re concerned with the crash of a specific application, you might scan the log file for the word “error” or the application name. Check the timestamps of these error logs for crashes that happen around the time that you suspect your crashes are happening. These parts of your system logs are most likely to offer clues about what’s causing your problem and how to fix it.
You may have to examine the logs a few times to collect the data you need. You may also have to try multiple different solutions before finding the right one. Then once you have, you can document it so others don’t have to go through the same process again.
Key takeaways
Good problem solving skills will help expedite the troubleshooting process and increase productivity.
-
When faced with a problem, analyze the situation to determine what steps to take.
-
There are two key tools that can help you resolve application errors:
-
Access to logs through the Windows GUI
-
Log analysis
-
After reaching your conclusions about a problem, communicate your findings.
-
Document your solution to every problem.
Troubleshooting tools for Windows
Some of the troubleshooting tools provided by Windows include:
-
Windows Update: One of the most important repair tools for Windows problems. Widespread and known Windows problems will often have a software resolution provided by Microsoft or Original Equipment Manufacturers (OEMs). Windows Update will find, download, and install the required and/or recommended software resolutions, which include operating system patches and updates, security updates and fixes, .NET framework updates, driver and firmware updates, etc.
-
Updates from the hardware manufacturer(s): Some OEM updates are not accessible through Windows Update. For these items, it is necessary to go to the OEM’s website for updates, patches, drivers, and firmware for components such as computer hardware, peripherals, and third-party applications.
-
Optimize Drives with Disk Defragmenter: When files on a hard drive are saved, deleted, or altered, fragmentation across storage blocks can occur. A file may become spread across the drive in non-contiguous storage blocks. This issue results in performance problems within the system as the hard drive spends additional seek time finding the scattered file fragments and piecing them back together. The Windows Disk Defragmenter can automatically relocate file fragments onto a continuous series of storage blocks in order to remedy these seek time delays.
-
Disk Cleanup: Windows utility that simplifies removing temporary files including downloaded program files, thumbnail files, system files, and temporary internet files. Disk Cleanup also offers an option to compress the primary hard drive where the Windows OS resides.
-
CHKDSK command: A command-line utility for Windows that scans hard drives to find and flag bad sectors. Flagged bad sectors will be removed from use and no data will be stored on them. The tool will attempt to recover any data found on the bad sector.
-
Disk Management tool: A Windows system utility for performing advanced storage management tasks, including initializing a new drive, extending or shrinking a volume, and changing a drive letter.
-
Event Viewer: Software tool for monitoring events and errors produced by the system, security, hardware, software, and more. The Event Viewer divides logs into four main categories:
-
Custom Views
-
Windows Logs
-
Applications and Services Logs
-
Subscriptions
-
-
Registry Editor (regedit): The Registry Editor should only be used by advanced system administrators. It is possible to cause serious system and software problems if the wrong edits are made to the Registry.
-
System Configuration tool (msconfig): Software tool for changing system settings, including the services and applications that can load on system startup.
-
Safe Mode (Windows 10 and 11): There are multiple options for booting into safe mode. A couple of these options include:
-
System Configuration tool - Can be used to configure a clean boot in Safe Mode to help isolate the source of a system problem.
-
Startup Settings - Can be accessed through System > Recovery or through the sign-in screen.
-
-
System Troubleshoot tool (Windows 11): The Windows Troubleshoot menu can be accessed from Start > Settings > System > Troubleshoot. The following options are available on the Troubleshoot menu:
-
Recommended troubleshooter preferences - Set preferences for Microsoft’s recommendations for troubleshooting tools.
-
Recommended troubleshooter history - Easy access to troubleshooting tools used previously.
-
Other troubleshooters - This menu includes tools for troubleshooting internet connections, audio, printers, Windows Update, Bluetooth, camera, incoming connections, keyboard, network adapter, power, program compatibility, search & indexing, shared folders, video, Windows Store apps, privacy, and misc help.
-
Common problems in Windows
The following is a list of common problems encountered in Windows, along with common troubleshooting first steps:
-
Computer is running slowly: There are many issues that could make a computer run slowly. Troubleshooting can involve multiple steps, many of which should be performed on a regular schedule to proactively prevent problems from happening. The first step should almost always be to reboot the computer. This step can fix a large percentage of problems reported by end users. If rebooting does not resolve the problem, check that there is sufficient processing power, disk space, and RAM to support the OS, hardware, software, and intended use of the computer. For example, video editing may require a relatively more powerful computer, a large amount of free hard drive space, and lots of RAM. Check system event logs for errors. Research any error codes found using the Microsoft knowledge base or an internet search to see if there is a known solution to the problem. Run an antivirus and anti-malware scan. Use Windows Update and OEM updates to ensure the system is up to date. Remove temporary and unneeded files and software. Check the software and services that load at startup for potential problem sources. Reboot the computer into Safe Mode to see if the computer performance improves. Unplug peripherals and turn off network connections to eliminate these as sources of the slow down. If the OS is Windows 11, use the System Troubleshoot tools found at Start > Settings > System > Troubleshoot.
-
Computer is frozen: Power off the computer. Wait 30 seconds to drain residual power and clear any potentially corrupted data held by RAM. Boot up the computer again and check system event logs. If the system does not boot, go to the BIOS settings and boot into Safe Mode to gain access to the event logs. Research any error codes found. If the root cause cannot be determined, run the same checks as listed above for “Computer is running slowly”.
-
Blue screen errors: If the blue screen provides an error code or QR code, record this information in order to research the root cause of the issue and possible solutions. Power off the computer, wait 30 seconds, then boot the computer again. If the system does not boot, go into the BIOS settings to boot into Safe Mode. Obtain system event logs in the Windows Event Viewer and research any error codes found there. If the root cause cannot be determined through event codes within the logs, then run the same checks as listed above for “Computer is running slowly”.
-
Hardware problems: Check the hardware OEM’s website for updates to drivers, firmware, and software management consoles. If this does not resolve the problem, check the system Device Manager to see if the device has been disabled or is not recognized. Additionally, check system event logs and research any error codes found. If the root cause cannot be determined, then run the same checks as listed above for “Computer is running slowly”.
-
Software problems: Go to the software manufacturer’s website to check for software patches or updates. If the problem continues after updating the software, check the application event logs and research any error codes found. If the root cause cannot be determined, then run the same checks as listed above for “Computer is running slowly”.
-
Application is frozen: End application processes in Task Manager. Restart application. If the problem persists, reboot the computer and try to run the application again. If the issue is still not resolved, then follow the instructions listed above for software problems.
-
A peripheral is not working: Check to ensure the peripheral is on and is receiving sufficient power, especially if the item is battery powered. Check cables to ensure they are attached securely. If the item is connected through USB, try a different USB port. If the device connects through Bluetooth, check to ensure that Bluetooth is active on both the computer and the peripheral. Reboot the computer to see if the system can reconnect to the device. Inexpensive, high-use peripheral devices experience high failure rates, especially keyboards and mice. Swap the peripheral for a working replacement to see if the problem was the peripheral itself, or perhaps an error in how the computer is detecting the peripheral. If the problem persists with the replacement peripheral, check the system Device Manager to see if the device has been disabled or is not recognized. Check the event logs for any errors. Visit the OEM’s website to look for updates to drivers, firmware, and/or software management consoles, if available. Run a Windows Update as well.
-
Audio problems: Check audio volume. Run the Windows audio troubleshooter. Check speaker cables, plugs, jacks, and/or headphones. Check sound settings. Update or repair audio drivers and sound card firmware. Check to ensure the active and default audio devices are the desired audio devices. Turn off audio enhancements. Stop and restart audio services in Task Manager. Restart the computer. Research if specific audio CODECs are needed for audio media. If audio is not working in a browser, ensure the browser has permission to use the system audio and/or microphone.
Resources
-
Windows Server performance troubleshooting documentation - Microsoft list of articles on common Windows Server errors, troubleshooting, and solutions.
-
How to scan and repair disks with Windows 10 Check Disk - Instructions for using the CHKDSK command.
-
Overview of Disk Management - Lists uses for the Windows Disk Management system utility, along with links to step-by-step instructions for using the utility.
-
How to use Event Viewer on Windows 10 - A walkthrough tour of Windows Event Viewer with screenshots and detailed explanations of each part of the tool.
-
Registry - Microsoft article about the Windows Registry.
-
How to use System Configuration tool on Windows 10 - Tutorial for using the Windows System Configuration tool.
Troubleshooting a problem in Windows
As an IT Support professional, you will likely run into problems caused by a full primary hard drive, where the OS is installed. An affected computer may display an error message stating there is insufficient space on the drive to save new files, apply an update, or install new software. In some cases, the computer might not provide an informative error message at all. Instead, the system may experience performance issues, hang, crash, or it might not even load the OS after booting. Note that it is a best practice to routinely perform maintenance and clean-up of computer hard drives to free storage space, improve system performance, and prevent the myriad of issues that can arise when the primary hard drive is full.
Imagine that you are an IT Support Specialist for an organization. An employee reports that their computer is running very slowly and keeps hanging. You know that Windows Update had been scheduled to run overnight to update all of the organization’s systems with multiple patches, updates, and fixes. Although it is possible for these changes to cause system problems, there is only one employee reporting a problem. So, it is more likely that the system did not have adequate storage space to install all of the updates on that employee’s computer system. You suspect that the primary hard drive could be full. Your troubleshooting and repair steps might include:
-
Check how much free storage space remains. A quick and easy troubleshooting step for system performance issues is to check if the primary hard drive is full. In this scenario, you discover that the employee’s hard drive has less than 5 GB of space left. Microsoft recommends giving Windows 10 at least 20 GB of free space for normal OS processes. You will need to find at least 15 GB of files to delete or move to another storage location.
-
Delete temporary and unneeded files. There are a few methods for cleaning out junk files from Windows. Two system maintenance tools for this purpose, found in several versions of Windows, include:
-
Storage Sense: Use the Windows Storage Sense tool to delete unnecessary files like temporary files, offline cloud files, downloads, and those stored in the Recycle Bin. You can also configure Storage Sense to regularly and automatically clean the hard drive for proactive maintenance.
-
Disk Cleanup: A simple alternative tool to Storage Sense. Disk Cleanup performs most of the same operations as Storage Sense, plus it offers a drive compression utility. Note: If you run Disk Cleanup on a drive, but the computer is still reporting “Low Disk Space”, the Temp folder is most likely filling up with Microsoft Store .appx files. In this case, you will need to clear the cache for Microsoft Store.
-
-
Reset Windows Update. Since you know the employee’s computer went through a Windows Update overnight and possibly did not complete this process fully, it may be wise to perform a Windows Update reset. The reset tool can check whether a system reboot is required to apply the updates, security settings were changed, update files are missing or corrupted, service registrations are missing or corrupt, and more.This utility can be found in the Windows system Settings menu, under Troubleshoot > Other troubleshooters > Windows Update.
-
Move files off of the primary hard drive and onto (one or more of the following):
-
Internal or external storage device: Install an additional hard drive or add an external storage device, like a USB drive or SD card, to hold user files.
-
Network storage: Network storage space is often available in network environments in the form of Network Attached Storage (NAS) appliances or large Enterprise Storage Area Networks (SANs). In these environments, end users should have network drive space mapped to their workstations for file storage, instead of saving files to their local hard drives.
-
Cloud storage (OneDrive, File Explorer, Google Drive, etc.): Providing cloud storage space to end users is a lower cost alternative to network storage. However, this option is less secure than onsite NAS or SAN storage.
-
In Windows System Storage, under Advanced storage settings, set the new drive storage as the destination for “Where new content is saved.”
-
Set any cloud storage solutions to be online-only. This will prevent cloud files from downloading an offline or cached version of the files to the hard drive.
-
Uninstall apps that are not needed (including Windows Store apps). This is an effective way to free up large amounts of storage space.
-
Run antivirus and antimalware software. Some viruses and malware intentionally fill up hard drives with garbage data.
-
Wipe hard drive and reinstall the OS. If none of the suggestions listed above solve the problem with slow system performance and hanging, consider wiping the hard drive and reinstalling the OS. This is the best method for repairing failed system updates.
Resources
-
Free up drive space in Windows - Microsoft article for Windows 10 and 11 that provides step-by-step instructions for freeing storage space on a hard drive.
-
Low Disk Space error due to a full Temp folder - Steps to clear the cache for Microsoft Store and reset Windows Update for Windows 10 and 11.
-
Manage drive space with Storage Sense - Instructions for configuring this Windows tool to automatically remove temporary files, downloads, offline cloud files, and empty the Recycle Bin.
-
How to use Event Viewer on Windows 10 - A walkthrough tour of Windows Event Viewer with screenshots and detailed explanations of each part of the tool.
-
How do I reset Windows Update components? - Steps for troubleshooting problems with Windows Update.